1.1 什么是Git Flow?
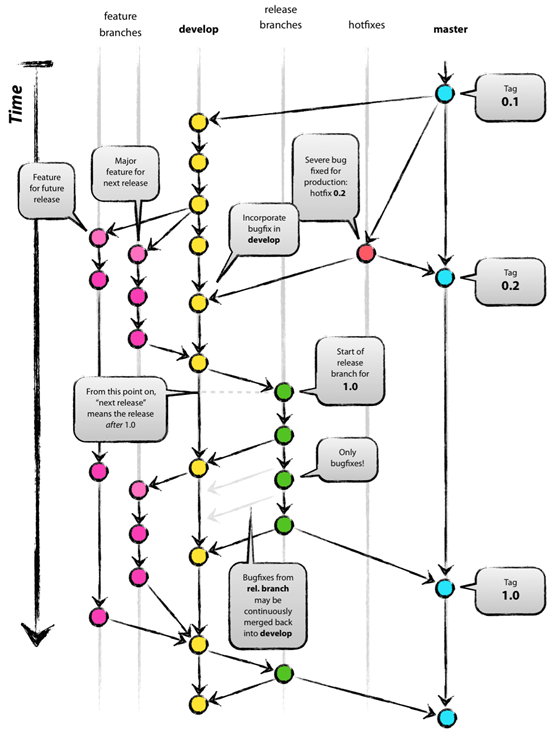
Git Flow实际上是一种软件项目管理模型,由大牛Vincent Driessen提出,核心思想如所图 1示。从中可以看出,主分支有master、develop两个组成,分别用于产品发布、功能开发;余下的三个辅助分支——hotfixes、release branches、feature branches,分别用于已发版本的bug修复、新版QA发布、新功能开发。
对于使用Git的朋友来说,分支的概念一定不会陌生,但是加上“主”、“辅助”这两个修饰词之后可能就有些迷惑了,个人的理解如下:
1) 主分支指的是在整个软件生命周期内一直存在的分支,不允许删除commit的历史记录,更不允许删除分支。例如,master分支记录的就是整个软件的发布记录(换而言之,可以拉取其中的任一commit,无须修改即可对外发布),只能从release branches或hotfixes两个分支中合并,每次commit必须打标签。
2) 辅助性分支则一般用于新功能开发、bug修复、新版QA,完成相应的功能之后可以删除这些分支,但是为了使整个开发过程有据可查,一般都予以保留。例如,已经对外发布的V0.1版需要紧急修复一个自测、内测均未发现的bug,则需要直接从master分支的V0.1开出一个紧急修复分支hotfixes-XXX,完成后同时并入master、develop两个主分支,hotfixes-XXX分支的存留取决于项目管理员。
1.2 Git Flow速查手册
假设项目现在处于以下状态:
ü 已经对外发布V0.0版本。
ü 已商定V1.0的新特性及其实施计划。
ü 已安装Git、TortoiseGit两款软件(也可通过360软件管家安装)。
根据上述假设,我制作了表 1。项目管理时,可以自上而下的查阅。例如,现在要开始V1.0的开发,则直接查阅【想要干什么】->【develop】一列中的内容,发现可以开启分支、合并分支等操作。项目开发时,可以从左到右查阅。例如,现在工作区正处于develop状态,则可以提交内测或者新功能开发。
另外,在实际开发过程中,还应注意各个分支名称命名的规范性。这里,使用了“分支功能名称-负责人缩写-描述”作为命名规范。例如,“dev-ll-1.0”表示V1.0版本的开发分支由缩写为ll的开发人员负责,“feature-ll-description”表示新功能description的开发由缩写为ll的开发人员负责。
1.3 项目实战
1.3.1 准备
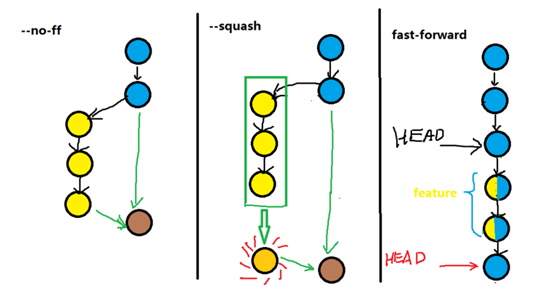
在实际项目中,要经常进行分支合并和冲突处理。对于分支合并而言,主要使用的命令为以下三种,依次对应了图 2中左、中、右三种合并效果:
1) git merge –e --no-ff release-ll-1.0,单独保留release-ll-1.0的每次提交,然后并入master,master分支中不含release-ll-1.0中提交记录。【推荐,这样可以保留所有分支的提交记录】
2) git merge –e --squash release-ll-1.0,整合release-ll-1.0分支中所有的提交记录为一条,然后并入master,master分支中不含release-ll-1.0中提交记录。
3) git merge –e release-ll-1.0 ,直接移动master分支的HEAD指向release-ll-1.0的最新提交,release-ll-1.0完整并入master。
下面讨论一种特殊情况,如图 3所示,iss53自C2分出后,原分支新增了一次C4提交,新分支增加了C3、C5两次提交,则分支合并时会结合C2(基准参考)、C5、C4做三方合并,合并效果参考上述三种情况的第一种。
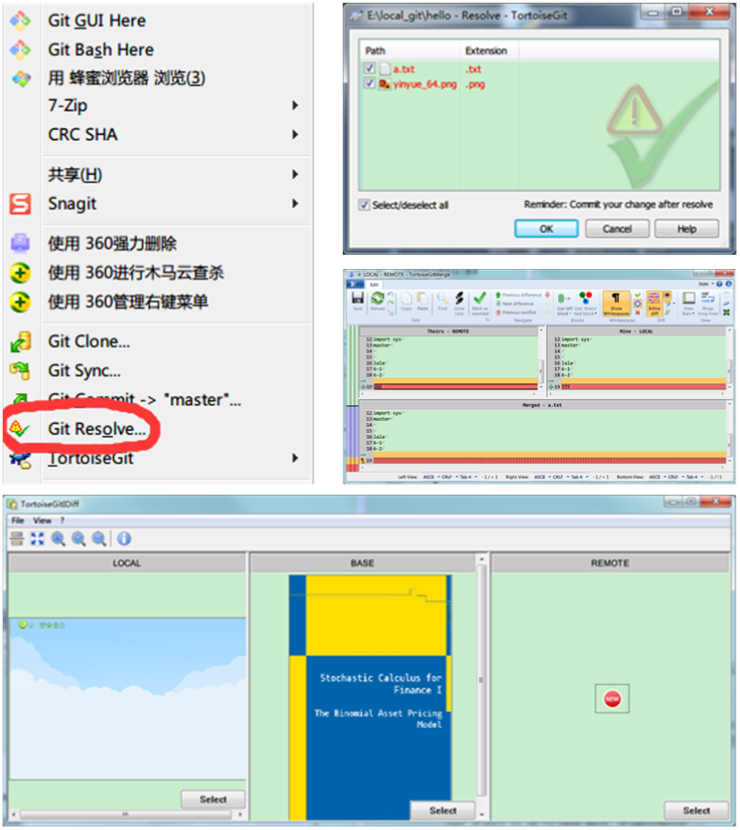
至于冲突处理,则可以直接使用TortoiseGit的Git Resolve工具,借助GUI工具可以轻松的处理文件或者文本冲突,具体如图 4所示。
1.3.2 初始化
1) 从远程库clone到本地,完成初始化提交。
$ git clone git@192.168.1.36:/home/git/repositories/sample.git
Cloning into 'sample'...
warning: You appear to have cloned an empty repository.
2) 使用Git GUI完成v0.0.txt文件的添加、提交和推送。
3) 添加标签。
$ git tag -a V0.0 -m "初始化版本V0.0"
1.3.3 转入开发分支
1) 从master主分支的V1.0开出开发分支dev-ll-1.0。
$ git checkout -b dev-ll-1.0
Switched to a new branch 'dev-ll-1.0'
2) 从主开发分支dev-ll-1.0开出功能开发分支feature-ll-add_email。
$ git checkout -b feature-ll-add_email
Switched to a new branch 'feature-ll-add_email'
3) 同时在dev-ll-1.0 、feature-ll-add_email完成V1.0所有功能的开发。
表 2 主开发、新功能分支同时开发
1.3.4 修复V0.0的bug
1) 切回主分支,开出bug修复分支hotfix-ll-0.1。
$ git checkout master
Switched to branch 'master'
Your branch is up-to-date with 'origin/master'.
$ git checkout -b hotfix-ll-0.1
Switched to a new branch 'hotfix-ll-0.1'
2) 使用Git GUI完成v0.0.txt文件的提交和推送。
3) 合并到主分支,发布V0.1并打标签。
$ git checkout master
Switched to branch 'master'
Your branch is up-to-date with 'origin/master'.
$ git merge -e --no-ff hotfix-ll-0.1
Merge made by the 'recursive' strategy.
v0.0.txt | 2 +-
v0.1.txt | 1 +
2 files changed, 2 insertions(+), 1 deletion(-)
create mode 100644 v0.1.txt
$ git tag -a V0.1 -m "V0.1"
4) 合并到主开发分支。
$ git checkout dev-ll-1.0
Switched to branch 'dev-ll-1.0'
$ git merge -e --no-ff hotfix-ll-0.1
Auto-merging v0.0.txt
CONFLICT (content): Merge conflict in v0.0.txt
Automatic merge failed; fix conflicts and then commit the result.
5) 使用右键菜单中的【TortoiseGit->GitResolve】来完成冲突处理,然后再通过Git GUI提交。
1.3.5 合并新功能分支
1) V1.0功能开发自测完毕,需要将新功能分支feature-ll-add_email合并到主开发分支dev-ll-1.0上。
$ git merge -e --no-ff feature-ll-add_email
Auto-merging v0.0.txt
CONFLICT (content): Merge conflict in v0.0.txt
Automatic merge failed; fix conflicts and then commit the result.
2) 使用右键菜单中的【TortoiseGit->GitResolve】来完成冲突处理,然后再通过Git GUI提交。
1.3.6 V1.0的QA与对外发布
1) 从主开发分支dev-ll-1.0开出待发布分支release-ll-1.0,用于发布前QA。
$ git checkout -b release-ll-1.0
Switched to a new branch 'release-ll-1.0'
2) 使用Git GUI完成QA过程所需的文件提交、推送。
3) QA完成后,将待发布分支release-ll-1.0并入master分支,并打标签。
$ git checkout master
Switched to branch 'master'
Your branch is ahead of 'origin/master' by 3 commits.
(use "git push" to publish your local commits)
$ git merge -e --no-ff release-ll-1.0
Merge made by the 'recursive' strategy.
v0.0.txt | 8 +++++++-
1 file changed, 7 insertions(+), 1 deletion(-)
$ git tag -a V1.0 -m "V1.0发布"
还有一点需要注意,若此时V2.0版本已经展开实施,则仍需将发布分支并入dev-ll-2.0分支;否则,直接从master开出dev-ll-2.0分支。
小工具
https://github.com/github/gitignore.git
 电光石火-穿越时空


